Yellicode
The extensible code generator
- Getting started
- Tutorial - Model driven basics
- Tutorial - Full stack Angular application
- Fundamentals
- How-to
- Modeler
- Reference
Adding custom meta data
Adding validation rules
Now you've got a simple model in place and know how to use platform-specific types, let's add a bit of domain knownledge to our model. In the end, it's very likely that there will be some sort of user input: in our sample application, users would enter new issues through a user interface, and these issues would be saved in a database.
In this part of the tutorial, you will learn how to enrich your model with custom constraints. By defining constraints in the model, you will have a single place from which you can generate validation rules and, for example, database constraints (should a field be nullable? And what should be the max length?).
Creating a custom profile
We will define constraints using a custom profile. As you've already seen in the previous part of this tutorial, profiles are a powerful extension mechanism. You will see that it is easy to create one yourself, and that Yellicode makes it easy to use your custom profile from inside a code generation template.
Go back to the IssueManager model in Yellicode Modeler, and follow these steps:
- In the Project Explorer, expand the Profiles panel and click Create a new profile.
- For the profile name, enter
IssueManagerProfile(you can ignore the Visibility input). - The new profile will be opened. Feel free to enter your own description.
Adding a custom stereotype to the profile
For defining our validation rules, we are going to create a so-called Stereotype. A stereotype describes how elements in a model (such as classes and attributes) can be extended with extra values. These extra values are called 'tagged values'.
- In the Project Explorer, right-click the
IssueManagerProfileprofile and choose New Element => Stereotype. - For the stereotype name, enter
CustomConstraints(again, ignore the Visibility input). - The new stereotype will be opened. In the
Extendssection, checkAttribute. This indicates that the stereotype can only be applied to attributes in the model.
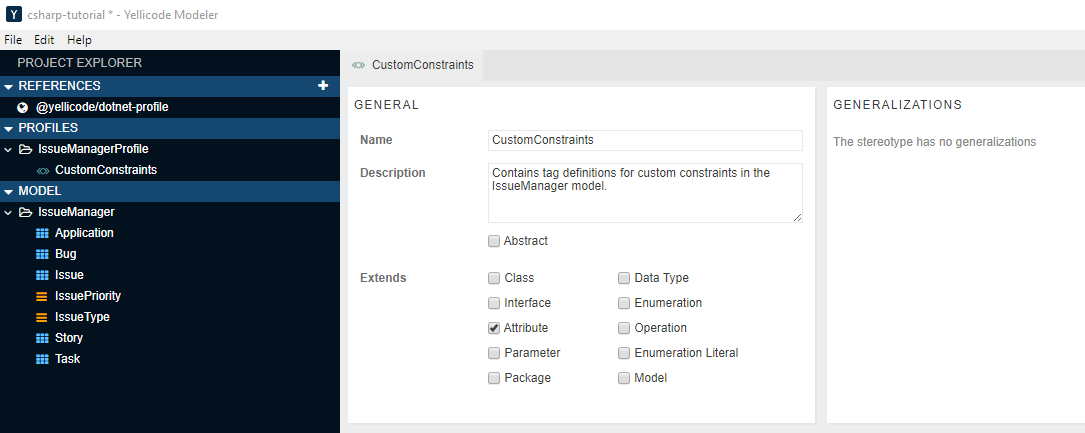
Defining the 'Required' tag definition
Let's define two types of validation: required field validation and string length validation:
- In the Tag Definitions section, click the plus-icon to create a new definition.
- For the name, enter
IsRequired. - When the attribute editor panel opens, find the Type selector and choose boolean.
- Repeat steps 1-3, but now create a tag definition
MaxStringLengthwith type integer.
Applying the validation rules to your model
Now that you have defined your first profile with a stereotype, it's time to put it to use by applying them.
- In the Project Explorer, right-click the
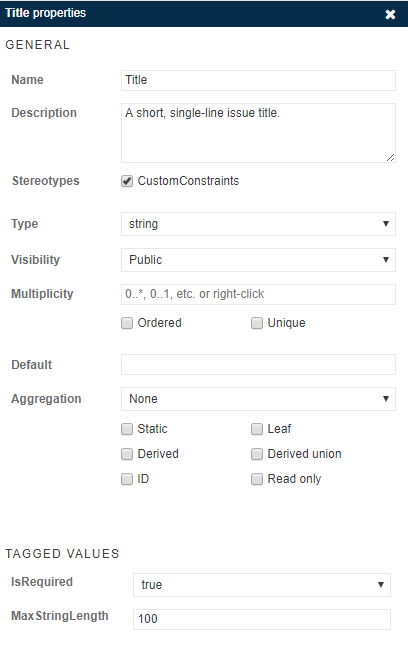
IssueManagermodel and choose Apply Profile('s). In addition to the .NET profile from the previous part of the tutorial, check theIssueManagerProfileand confirm. - Open the
Issueclass and click theTitleattribute. - Then, in the
Titleproperty editor, find the Stereotypes selection and checkCustomConstraints. - A new section named Tagged Values appears in the property editor, showing the tag definitions that you created in the previous section.
- As the final step, set
IsRequiredto true and fill in a reasonableMaxStringLengthfor a title.
Now that you've set constraints on the first attribute, feel free to repeat steps 3-5 for other attributes in the model. In the next part of this tutorial, you will learn how to use these constraints to generate validation code. But before you continue, make sure that you have saved the model (you will soon find out why).
Continue to Part V - Using custom meta data »