Yellicode
The extensible code generator
- Getting started
- Tutorial - Model driven basics
- Tutorial - Full stack Angular application
- Fundamentals
- How-to
- Modeler
- Reference
Bookstore Tutorial
In this tutorial, you will build a simple model-based bookstore management web application using Entity Framework Core, ASP.NET Core Web API, Angular and Bootstrap. The resulting application will have screens and REST endpoints to perform CRUD (Create/Read/Update/Delete) actions on all items in the bookstore. You will use Yellicode to generate most parts of the application. As IDE we use Visual Studio Code.
By the end of this tutorial, you will be able to build your own application using Yellicode, simply by changing the underlying class model and changing a few lines of code. Feel free to use parts of it, extend it or simply generate a prototype for your next project.
The tutorial consists of the following parts:
- Part I: This introduction. Follow the steps below to get the initial application up and running.
- Part II: generating the back-end
By the end of part II, you will be able to generate an ASP.NET Core Web API, an Entity Framework model and REST resources.
If ASP.NET is not really your cup of tea and you are only interested in building the front-end, feel free to skip part II and jump ahead to part III after this introduction.
- Part III: generating the front-end
In part III, you will learn how to generate Angular components, routes, TypeScript typings and data services from a class model.
- Part IV: customization using profiles
In the last part, you will learn how to extend the class model using profiles and tagged values, allowing for fine-grained control over generated code.
Prerequisites
- The Yellicode NPM packages and Modeler should be installed. See Installing Yellicode for instructions.
- .NET Core 2.0.0 SDK or later.
- Visual Studio Code version 1.18 or later (because this tutorial uses the Multi-root Workspace feature).
- Visual Studio Code C# extension.
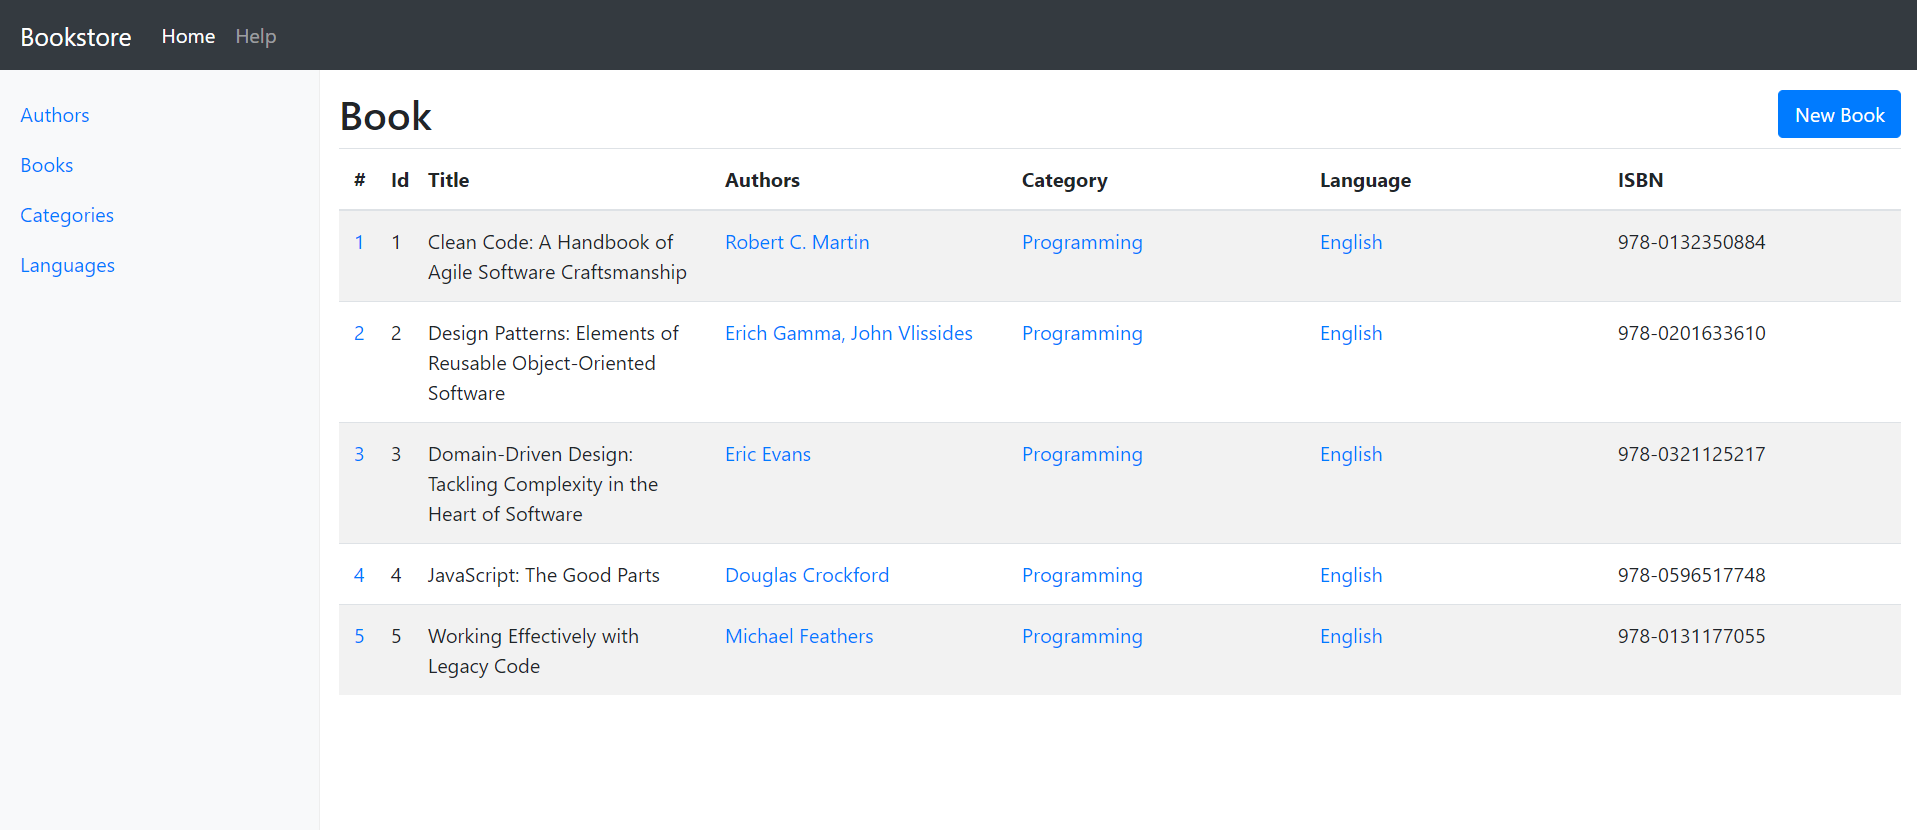
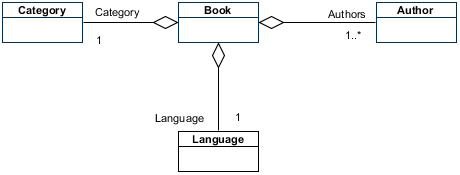
The Bookstore model
No model-driven application without a model. The bookstore model only contains a few classes that are related as follows: a Book has one Category, one Language and can have one or more Authors (attributes left out for brevity).
Creating the application
You won't need to build the full application from scratch: the download contains a minimal setup for a ASP.NET Core + Angular + Bootstrap application. It will use the standard Dashboard template from the Bootstrap examples page.
Before starting with part II, download the tutorial files here and extract the zip file to a location on your computer. If you prefer to start at part III, download the tutorial files here. The archive has the following structure:
- Api
    - Controllers
    - Data
    - Resources
- App
    - src
        - components
        - css
        - services
- CodeGen
    - api
    - app
- The Api folder contains the REST API code. This is an ASP.NET Core application with some code to support this tutorial.
- The App folder contains a minimal Angular application that you will build upon for part III.
- The CodeGen folder contains all Yellicode templates, configuration and model files.
- The root of the archive also contains a workspace file
bookstore.code-workspace.
Start by opening the workspace file in VS Code. When VS Code prompts to install missing dependencies, choose Restore to continue.
Now you have opened the workspace, install the necessary NPM packages:
- Open a command prompt at the App folder.
- Run the npm install command:
npm install
- Repeat steps 1 and 2 for the CodeGen folder.
Running the application
Almost done! Let's start both applications to make sure that they were installed successfully:
- Start the API by pressing F5 or CTRL+F5. This should start the API with the
.NET Core Launchconfiguration. A browser window will open at http://localhost:5000, confirming that the API is running. - Open a command at the App folder and run the npm start command:
npm start
This will build all source files, start a lightweight web server and launch another browser window with the (at this point, almost empty) web app.
Opening the model
The initial bookstore model can be found in the file CodeGen/bookstore.ymn. You don't need the model yet to get started, but you will need it during the following parts of the tutorial.
- Start Yellicode Modeler.
- Choose File -> Open.
- Select file
CodeGen/bookstore.ymn.
That's it! If you followed all steps, the initial application is up and running, but there is nothing in it yet... Let's generate some code in Part II.
Continue to Part II - Generating the back-end »No, thanks, I'll skip the .NET part.